Videos on the 3M™ Scanner
Below, you can check 3 videos covering the 3M™ Dental Scanner with their respective transcriptions.
3M™ Digital Scanner: Scanning
Video Transcript
Today, we are going to utilize the True Def from 3M™ digital scanner to fabricate an all ceramic crown on Kim, our patient, maxillary left canine. We’re actually going to do it modulus, which is very cool, so it’s going to be a virtual impression. I’ll go ahead and scan it, scan the opposing, scan the bite, send it off to the dental lab as well as 3M™. They’ll make a virtual model. They’ll trim the dyes virtually. They’ll fabricate the crown, utilizing CAD/CAM technology and then we’ll have them back and we will seat the crown.
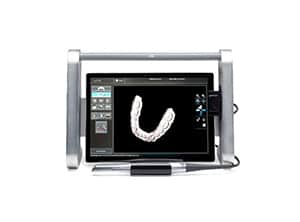
Utilizing the True Definition 3M™ Digital Scanner
We removed an existing crown that Kim had actually fractured. We go ahead and re-prep to clean it up a little bit. The margins were placed sub-gingival from the previous dentist. Just as with our analog impressions, we need to have good definition of our margins and we need to isolate our margins. I’m not a huge cord packer. I like to use a laser and then a Kalen putty like Access Edge and I’ll show you what that looks like. This is the AMD Picasso light. It is a diode laser. We’re actually going to trough, almost as if I’m packing cord.
The nice thing about using the diode laser, it actually will stop bleeding. It will cauterize tissue. It actually works more efficiently when there is a little bit of bleeding, but I’m able to take this tip. This is 300 microns, down into the sulcus and just create a trough just as if I pack cord. It’s really a-traumatic. There’s a little bit of what we call laser char, and we just take hydrogen peroxide. This is just in a syringe with an Ultradent tip. We just remove that. Now we have our margins exposed, again, just as I’m packing cord. With the Picasso Light, the diode laser, he’ll have no post-operative pain with this at all.
Access Edge from Centrix
Then I’m going to use a material called Access Edge, and it’s available from Centrix. In this material is a kalen putty, and it expands as it gets wet, so I just inject it into the sulcus, again a-traumatically. This is great around implants. Stops bleeding, it expands, retracts the tissue. Typically I’ll leave that on for about three minutes, and then we’ll rinse it off and do our scan.
Lower Scans
Now since we’re doing the maxillary canine, I would like the scan to at least go from second bi to second bi, I don’t have to do a full arch at this point. I could but there’s really no reason to, I want to be able to articulate this, and I want the surrounds to be able to see the contralateral canine, so they can match contours. We’re going to go ahead and scan the lower now. Now, a lot of the digital scanners say they don’t need powder, and that’s a nice feature, but honestly they will get a better scan if they actually have powder.
Powder vs. Silicone
The powder of the early scanners was very difficult to use, and messy. The True Def uses powder but it’s really a silicone and it’s almost like a light graphite. My goal with this is to only basically powder areas that have reflection, and these would be shiny surfaces. Typically on a prep, that’s dented and it’s not shiny, I hardly have to powder that at all. I’m powdering facets, all ceramic crowns, enamel that looks shiny. Let me just have you hold this a second Jessica. I’m just going to air dry this. A very light dusting. I’m going to go ahead and grab the camera.
True Definition Camera
The nice thing about this True Def, it is the smallest camera on the market, and it’s moving video. You can see here, as it goes from grey to red to white, I’m capturing the image. Wherever there’s voids, it means that I’m not capturing the image. At any point, I could stop and start over, or add to it. If my patient had a gag reflex, I could stop, take a break, and then come back to it. This can be manipulated, as you can see, I didn’t get the lingual surfaces at all. I’m just going to scan and add to what I already did.
Computer Recognition
I’m going to back to some section in the mouth that the computer recognizes. I did this section to the bi’s, and I’m going to recapture that area there. A little bit of shininess. We’re going to spray again. Now go ahead and take the wand, the camera, find a place that the camera, or the computer recognizes as a reference point. Then I just go around the arch. Going to go to the second bi on the other side. It’s very very fast. In fact the computer itself and the scanner is faster than I can probably even move it to capture the image.
Anytime I get lost, when I turns gold like that, it means the computer doesn’t recognize anything, I can go back to a section that it does recognize, and it will stitch this together. I lost it, I can come over cusp tip, come onto the facial, and grab the rest of the images. At any point, I can come back, take this out, if I make a mistake or I have some sort of area that didn’t scan well, I can actually go in and erase that last part of the scan. We’re a little shiny there, that’s why we’re not getting a good scan or I can manipulate it. It could be the angle that is giving me those areas that it doesn’t recognize.
I’m going to come back to find a spot that the camera recognizes and then move forward. The cusp tip on that canine, obviously important, we’ll just move it back and forth, and let’s go ahead and save that. You can see as we manipulate our scan around, this isn’t a real problem but I don’t like the way that it looks, so I’ll just fill that it. I’ll get the cusp tip of this canine, because this is going to be articulating with the opposing canine. Let me just have the pattern, I’m just going to zap that. These are all ceramic crowns, and so they tend to have a lot of glare and reflection, that’s why we’re going to zap these. I’m going to do this as well.
Scanning
We have up to seven minutes to scan, so we have a lot of time. I’m at a minute and a half. All right, so I’m going to go back and the computer is going to find an area that it recognizes, and then I’m going to grab that cusp tip, and I’m going to grab the facial surfaces. You can see, as soon as the computer or the camera, the software, does not recognize part of the teeth, it will turn to that gold. I know I need to go back and find a section of the arch, or a section of a tooth, that it recognizes.
Then we’ll go ahead and save that. Make sure we have enough data so that the lab can articulate it, and also get our function. You have a nice digital scan. I could go to full arch, I really don’t need to, just because he’s in contact in all his teeth, we got a nice clean scan. This can either be sent to 3M™ and I can have a SLA, stereolithography model made, and the lab can then make that off of a model, or we can do it model-less, which we’re going to. Let’s go on up to the upper arch. We’re going to go ahead and rinse our kalen putty. Again, that’s Access Edge from Centrix.
Different Types of Putty
Several different ones on the market, one of the first ones, Expasyl by Kerr, very very nice material. Much more expensive when you have to use their gun, where I can just use these tips, disposable tips, single use tips, and I can put them in any CR syringe. I’m going to go ahead and put, just a Dri-Angle back here, to keep the cheek out of the way. Then I want to have them stay open, especially if I’m powdering, I don’t want it to get wet, so I’m going to give him a bite block. Light dusting of the powder. Again, these are all ceramic crowns, so a lot of reflection here. Let’s go ahead and begin our scan.
Operating the True Definition Scanner
Now we have the option, of either with the touch screen, pushing the play, or there’s an option where I can double tap this and that will activate and shut off the camera as well. I prefer the screen. A lot of clinicians prefer the double tap. Let’s go ahead and find our occlusal surface. There it is. Go back to the molar again, I like to run along the occlusal surfaces and incisal edges first, so they always have a reference point. In case I lose my position. You can see how fast this is, the scan. That was a complaint with a lot of the original digital scanners, is they were so slow. You can see where I lost my place, so we’ll go ahead and find the occlusal surface. I lost my place. I want to make sure I get an accurate representation of the proximal surfaces of the adjacent teeth since that’s where I contact is going to be.
Capturing Scans
I’m just going to go to the second bi on the opposite side. I want to get a good scan of the contralateral tooth, since this is what we’re going to be matching. I can go back and if I lose my spot, anywhere that the scanner recognizes, I can find my spot. There it’s not recognizing that, I want to get this incisal edge. Good, now see what that looks like. Now, if we get these arrows, okay so we get an error message, incomplete scan, add the coverage. The computer is not recognizing these images as a complete image. Which means I need to go back and capture. It’s saving it there for me.
It needs to find the relationship from the facial to the lingual service here. Let’s see if that did it. I’d like to just get this right here, so the mounting, otherwise the computer will cut that pre-molar off. Problem is the bite block was keeping the scanner from getting back that far. We got our maxillary scan with a prep, we got our mandibular scan, now we need a bite relationship.
This is the left side, so we’re going to put left. What we’re going to do is just spray the buckle surfaces a little bit. Again, with the ceramic, it’s shiny. We can go ahead and have the patient bite down all the way. I just need two or three teeth. Once the computer recognizes us, I’d like to get down the gingival margins with both arches. We’ll just bring it forward. Let’s see if we got enough of a bite. Perfect. We can actually go in there and we can check clearance at this time if we need to. We can blow it up if we need to see it. It’s a great looking model. Again this can either be an epoxy model, it can be an SLA, or a virtual, and we’re going to have a virtual.
Saving and Sending Scans
All right, let’s go ahead and mark our prep. Going to be maxillary. We’re going to add a prep, that tooth, tooth number 11, check. We can then go in and verify that we have margins, we can actually make it 3D if we want to. Then we write our prescription. Our prescription here, we have the option of the date that we want. What lab, obviously we’re going to send it to Keating Dental Lab, no models. All right, so we’re going to request it next week. We are then going to have a full coverage crown, push okay. It’s going to be tooth number 11. Okay. Our material, is designed as a single material, we’re going to do all ceramic. If we have a certain preferences in occlusal clearance, the opacity, occlusal staining. We can actually type that in and that can actually be our default.
We’re actually going to utilize zirconia, so we’ll put other, you’re going to use the KDZ Bruxer Ultra, because what he has now are zirconia that are overlaid with ceramic, so in Keating, that’s our ultra. We will go ahead and type in what we’re going to do. It’s going to be a KDZ Ultra. Shade guide, we’re going to use the VITA classical that matches existing restorations. Our shade is B1. We’re going to go ahead and sign, confirm, put in our super secret password. Then this is sent to 3M™ and to Keating Dental Lab. Okay, when this becomes completely green it means it was sent and accepted. We’re done, other then making a temporary with Kim. What we’re going to do in the continuation of this video, is we are going to actually run you through the process of what Keating does with that information as they design the crown. Then we will seat the restoration next week.
3M™ Digital Scanner: Patient Interview
Video Transcript with Dr. Hornbrook
Today we took a digital impression on Kim, and you saw it in the process as a clinician, what I like about the digital scan, certainly is the accuracy. The ability to see my prep instantly. Also this is sent to the laboratory, and literally they could be trimming the dye the same afternoon that I actually prepped the tooth, within an hour. That’s a huge advantage in getting cases back sooner. Also for my patients, for comfort, and we’ll talk to Kim about this, is the ability to do a little bit of an impression, take a break, do a little bit more, if I miss an area I can go back and capture it, versus taking a traditional analog or polyvinyl impression and then taking out and realize that we screwed up, we got to start all over and wait the four to five minutes, however long the impression takes to set up.
It’s great for patients, pedo-patients that just can’t stay open long enough. Some of them are elderly or maybe you want to take just a little bit of the impression at a time. You know, the typical impression on Kim, since we’re replacing a canine, we went on the left side, we went all the way back to the molar and I came to the second premolar on the right side, so that the lab can now duplicate the shape of the contralateral tooth, and we get a great mounting. Also the computer will tell us if we have a good mounting, we see that instantly. At a laboratory calling and saying we can’t mount this case, we’ve all encountered that and that’s a huge problem.
The Advantages of the 3M™ Digital Scanner
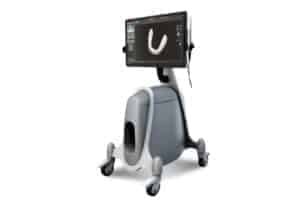
There’s lots of advantages and the typical scan will take me anywhere between a minute and a half, maybe two minutes on some of our patients where I take a little bit of a break. It’s quick and the more you do it the quicker you’ll be at it. In my practice, and here at Keating Dental Lab, I chose the True Def from 3M™. I like the size of the wand itself, it’s the thinnest on the market. Also, this is the most affordable camera on the market. That doesn’t mean that you’re limited just to the True Def. Some of you may be looking at iTero’s or already own one, or have a Cerec or PlanScan or TRIOS or Carestream. Those are all other examples of digital scanners. We at Keating Dental Artist accept all those.
Whether it’s done with the True Def or any of the other digital impression taking machines or scanners, we can accept those as a digital file, we can either make models or not, depending on what your preferences are.
Interviewing the Patient
That’s my taking on all this technology. Let’s talk to the patient.
Dr. Hornbrook: You’ve obviously had some crown bridge before, so you’ve had lots of impressions taken. What was your feeling about having a digital impression versus a traditional impression?
Kim: It was much easier. It was not as traumatic on me, having to have the putty put in my mouth and wait for it to harden up before you could take the impression out, that’s very uncomfortable. The scan was fast, it was easy. It wasn’t uncomfortable at all. I thought it was a 100% improvement.
Dr. Hornbrook: Also you’re a techno guy, so the technology certainly makes you feel better about that I’m keeping up with what technology is offering us as clinicians, and we’re doing the very best we can.
Kim: Well absolutely, I think that it all begins to come together with the technical expertise that you have, the dental laboratory that you use, and the materials that you’re using today. They really give us a nice smile that’s going to last the rest of our life.
Dr. Hornbrook: Absolutely, we hope so. Until you break another one, right?
Kim: True.
Dr. Hornbrook: I wanted to talk to you a little bit about the powder, because that’s something that’s come up with a lot of different manufacturers. We powdered it for both arches as well as the bite. Was that uncomfortable for you? Was that a negative for you?
Kim: Not at all, not at all. In fact I couldn’t even tell it was there.
Dr. Hornbrook: Again, this is why I don’t think the powder is a real problem. The older powder from the older machines were, but I mean this is just, it’s battery operated, it’s just such a light, almost like a silicone, it’s not uncomfortable. For those that are using some of the other machines that don’t require a powder, sometimes you get some standard deviation in your scans. You may look at some of the powdering systems, especially if you have preexisting ceramic crowns. We’re going to go ahead and move forward and we’re going to run this case through the laboratory, you’ll have the opportunity to see that, and what Keating Dental Lab does with this digital scan, and then we’ll see the crown on cam. Thanks for being such a great patient.
Kim: Thank you Dr. Hornbrook.
3M™ Digital Scanner: Final Crown Seating
Video Transcript with Dr. Hornbrook
We’re back for our second visit with Kim, and as you recall, we took a digital impression for the maxillary left canine. The nice thing about digital is our ability to actually blow up the margin, see it visually, then this gets modemed to the laboratory and then they basically make a virtual model and fabricate the restoration on the virtual model. At this point we don’t have a model to work with and fortunately here at Keating we know that we have the accuracy that we really don’t need a model, but let’s check it here, to certainly reinforce that.
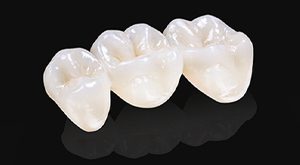
I went ahead and anesthetized them a little bit. Wiggle off the temporary. We did a great job taking care of the temporary and the tissue looks great. Here is our KDZ Bruxer Ultra. It’s a zirconium dioxide coping or core, just like a PFM would be, and then it’s overlaid with Noritake porcelain.
KDZ Bruxer Ultra
We use this material for a number of reasons, one it’s the most aesthetic of any of the zirconia materials because it’s overlaid with beautiful ceramic. Kim has a full mouth rehabilitation that was done previously, that was all done with zirconia overlaid with a powder liquid ceramic, so we wanted to match that. The first thing I’m going to do is check margins and contacts.
Shades
I’m going to reduce, just a little. It’s just a little tighter then I would like. Certainly acceptable, but just a little tighter then I would like. I’m just going to take a fine finishing diamond, this is a 25 mark fine finishing diamond. Just brush that area. Then we’ll polish it back up. Let’s try that again. Because this zirconia has actually a translucent core, relatively translucent core, I want to tie it in with glycerin to make sure we like color because we can modify shade very slightly. Not a lot, but very slightly, with different shades of resin cement. I like to try it out with glycerin first, that’s actually DeOx, DeOx from Ultradent products. Trying it in with clear first, so then I can use a clear cement, which won’t influence it at all, the shade. Pretty straight forward shade, due to us matching his existing.
Ivoclean
We’re going to go ahead and bond this into place, since this is zirconia, we’re going to use a cleaner, and we’re going to use Ivoclean, which is a sodium hydroxide from Ivoclar. To clean the inside, let that sit for about 20 seconds. That removes any of the saliva or any of the protein or organic layers that may become contaminates no this. Then we’re going to put a zirconia primer and we’re going to use Z-Prime plus on this, from Bisco. It’s bright pink liquid. Again, it’s called Ivoclean.
You do not want to clean the internal of any of the zirconia dioxides, whether it be monolithic or layered, with phosphoric acid. It will inhibit the ability to get actually a bond to it. We can get a little bit of a bond to zirconia so we might as well try to bond this as most durably as possible. We’ll let that sit for 20 seconds. So this has sat for 20 seconds. We’re going to rinse thoroughly and air-dry. Got a very nice clean non contaminated zirconia surface. Then I’m going to use a zirconia dioxide primer, and this is Z-Prime plus from Bisco. This would be similar to the siling that you would use for your all ceramic restorations but this actually gives you a chemical bond to the zirconia.
Total Etch Technique
We’re just going to let that sit for at least a minute, we’ll set that aside, and now we’ll go ahead and go to the tooth. We’re going to utilize a total etch technique as we bond this into place. We’re going to use a 35% phosphoric acid, followed by a dentin bonding agent, the bonding agent will be All Bond 3 from Bisco. Let’s go ahead and etch the enamel first. Followed by the dentin. There’s an enamel collar around this. Let it sit for at least 15 seconds. It might have a bitter taste here. I’m not going desiccate at this point.
Desensitizing Agent
Actually, before I put my primer, I’m going to put a desensitizing agent, and this is a glutaraldehyde water HEMA solution, there’s several on the market. The one I prefer is called Micro Prime G from Danville engineering. Micro Prime G and it actually increases bond strength. Great studies on that, and it also decreases any sensitivity. Any time I do a total etch, whether it be a crown like we’re doing on Kim today, or whether it be a direct composite even, after I etch, don’t desiccate, just remove the excess moisture. Put a layer of the Micro Prime G on, let it sit for about 10-15 seconds. I don’t like to air dry this, because then again, I don’t want to desiccate. We’ll just take the high speed suction and just suction the excess moisture. Our goal with total etch is to bond to a non desiccated tooth. Not wet not dry.
Primer
Now we’re going to go ahead and mix our primer. This is ALL Bond 3, it’s an AB primer. It’s a dual cure as well as a light cure. This is a fourth generation dentinal primer. Multiple layers of primer. This has a self limiting film thickness, of less then 10 microns, so I’m not worried about this keeping my crown from seating. You’ll smell a little bit of an acetone like smell Kim. We’re going to ahead and use moisture free air. This is an alcohol based system, so we need to dissipate the alcohol and allow it to evaporate. This is an A-dec, made by A-dec, warm aired tooth dryer, which gives us dehumidified and oil free air. Let’s go ahead and cure that.
VALO Cordless Light
This is a VALO, VALO, cordless light from Ultradent, definitely one of my favorite lights. It’s available in multiple colors. Let’s go ahead and have the dual link. Dual link, this is from Bisco, it’s my favorite dual cure resin cement. Because there’s some opacity, a little bit opacity because of the thickness of the crown in the zirconia, I prefer to use a dual care versus a light care. Let’s first make sure that that zirconia primer, the Z-Prime Plus is completely dry, which it is.
Loading the Crown
Now go ahead and load our crown with the dual link, we don’t need much. Now we’re going to seat it to place. Make sure it goes all the way down. We’re not going to remove any of the excess. We’re going to take a 2mm light guide, we’re going to cure it dead center away from the margins for 5 seconds. On the facial, and because it’s a full coverage crown, on the lingual. This is a light by Ivoclar, another very nice light. It’s called the blue phase style.
Final Steps
Once we’ve tacked it into place, we’re going to go ahead and wave the margins for about 5 seconds. Then we’ll take either a scaler or a Bard-Parker Blade, I prefer the number 12 Bard-Parker blades, and we just peel away this excess. It goes to a gel stage and easily just peels right off. The cement is so easy to use because of the way it cleans up in the gel phase. For some reason we get a little bit of resin that binds the contacts, I use this little saw blade, it’s called a serrated saw, from Brasseler, and it just breaks through that, then I can floss through. Let’s try that again.
Eliminate this, we’ll go back. We’ll use the serrated saw just to break through that resin and a proxy then we’ll take our floss. Make sure to remove as much excess as possible. Let me have the DeOx. Then we’ll take glycerin, this is DeOx from Ultradent. Put it around our margins to eliminate an oxygen inhibition layer from Foreman, and then we’ll cure. Even though it’s dual cure, I like to use a light for at least a minute, to get maximum polymerization in the shortest amount of time. Let’s go ahead and rinse. I’m going to floss through again. Contacts are great. Margins are great. Let me have another piece of floss please. Thank you. Just a little bit of excess cement there. Let’s rinse.
Good. Let’s check the contact. Tap up and down, slide to your left. Open. Bite down. Slide to your left. Good. The fact that we took, basically a 3/4 arch, the line was able to match the contours of the adjacent tooth, they were able to mount it and go through the laterotrusive movements, we want canine guidance.
Final Conclusions
Great. As you can see, using digital we are able to eliminate the need for impressions. We can get it to the lab and back, from the lab much quicker because there’s not the time that we have to ship it. We don’t have to have the models poured up, we don’t have to have the dyes being trimmed. That’s all done digitally in a matter of a couple hours. Then we fabricated the crown, the mesial contact was a just a little bit tight, but I’d rather have it a little bit tight then lose, and more than likely with the time that he was using his temporary, maybe we got a little bit of migration, but not much.
We’ve got great occlusal contact, canine guidance, the aesthetics are great. The next case, as you look at what you’re doing in your office now, with traditional impressions, where a patients point of view, that it’s more comfortable. Next time you take a traditional impression and the patient says I hate taking impressions, or I hate to have my impressions taken, think about digital. If you’re using digital now, be sure to contact us at, Keating Dental Lab, so that we can help you through that process to make it as seamlessly and easy as possible.
Watch also:
How To Take A Digital Impression