
In the first ever 4K Ultra HD Chair Side Video Tutorial, Dr. David Hornbrook (Clinical Director of Technology) shows you how to take an anterior prep shade & helps your practice achieve optimal aesthetics by walking you through prep shades, prep guides and the influencing factors in developing the final shade for your anterior restoration.
Included in this remarkable clinical video series is “how to take a stump shade”, esthetic crown material options and how to use them and finally wrapping up with the Replacement of the old anterior crowns with solid zirconia high esthetic restorations.
This 4K dental video tutorial is part 2 of 4 of the “REPLACMENT OF PFM ANTERIOR CROWNS WITH AESTHETIC ZIRCONIA RESTORATIONS” Web Series with Dr. David Hornbrook.
Watch the whole anterior crown restoration procedure below:
Part 1 Removal of Anterior PFM Crowns:
https://keatingdentallab.com/videos/part-1-removal-of-anterior-pfm-crowns-chair-side-procedure
Part 2. How to take a Stump Shade on Anterior Crown Restoration:
https://keatingdentallab.com/videos/part-2-how-to-take-a-stump-shade-on-anterior-crown-restoration
Part 3. KDZ Bruxer® Aesthetic Anterior Crown Material Solutions (Whiteboard Lecture):
Part 4. Replacement of PFM Anterior Crowns with Aesthetic Zirconia:
Video Tutorial Transcript:
Hello, I’m Dr. David Hornbrook, the Clinical Director of Education Technology at Keating Dental Lab in Irvine California. Today we’re going to talk about, I think one of the most important things and often not done by dentists in achieving optimal aesthetics. So Dale is our patient and we’re going to do the four interior teeth. Now with the trend going away from opaque or metal based restorations, we really have to look at what are the influencing factors in developing the final shade. You know with metal or PFM, or even some of the earlier zirconia, they were so opaque, the final shade really only derived from the porcelain itself.
The fact that these are translucent and we’re making them much thinner, there’s three factors. One is the porcelain itself. So, if this was our final restoration on Dale, this obviously has chroma, value, and a hue. As we put it on the tooth, now other factors come into play. One of the factors is the shade of the preparation. If this was going to be his final restoration, it’s going to be very similar to this, the facial surface, this happens to be zirconia, the facial surface [00:04:00] is about .7 millimeters thick. And with the translucency, if I held this up to the light, you’d be able to see right through it. Which means the preparation underneath is going to influence our final shade. If we were going to use a lithium disilicate like Emax or Empress and sometimes we’ll make those at .2 and .3 millimeters thin, it’s even more of a factor. So, as a clinician, as an educator and also as a consultant in the laboratory, I see this far too often when dentists do not give us the prep shade, then we’re just guessing. Then we really have to go to a material that’s so opaque, so the preparation isn’t influencing our final shade.
So Ivoclar created what they call their natural die material. It used to be called the stump guide, some of you have been using this for years, remember it’s called the stump, but they got away from that for a number of reasons. One is the shades of the original stump guide did not match the teeth very well and second is, I think I’d rather talk in front of my patient about [inaudible 00:05:00] the prep than the shade of your stump.
All right, so this is the material. Now, you could use the shade guide for this because we do get that occasion where people will say “Oh, the preparation is C4,” but the problem with that is, in the laboratory, what we’re doing is we’re taking material that’s designed to match these shades and kind of just guessing of what does that match on the Vita shade guide, or the Chromoscop or another material shade guide. So, let’s go ahead and take our shade, so we just prepared the teeth, this is an OptraGate from Ivoclar. Okay, so we have the OptraGate in, are you okay? Is it comfortable?
Speaker 2: Yeah, I’m fine.
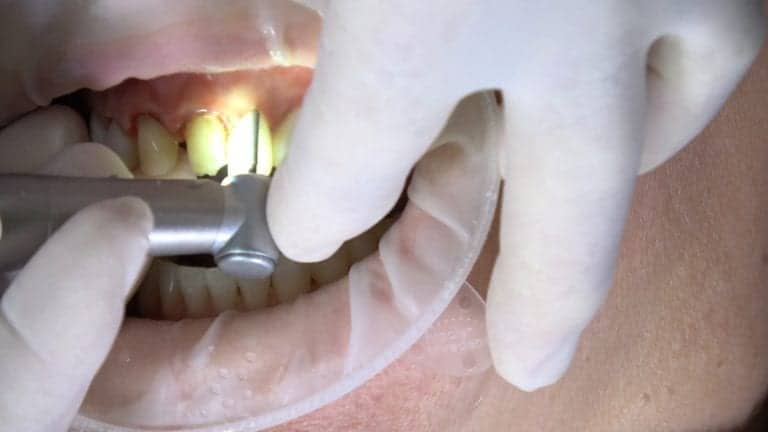
Dr. Hornbrook: Okay, good. So, root canal treated teeth, very very dark stain from previous decay [00:06:00], so we’re going to go ahead and take our natural die prep guide, and our goal with this is to try and get as close as possible. They don’t always match exactly, but it’s really about value over the amount of grayness. Though the ceramist knows the approximate value or the shade of the preparation and how thin or thick the restoration is, then they can choose the appropriate ceramic to give us our desired shade and neutralize or utilize that [inaudible 00:06:27] prep to get that final shade. So, starts in ND and is natural die ND1 to 9 being lightest to darkest or lowest in value. So you look at number 7 on the right lateral, we’re about an ND3. Now, at this point, I’d like to take a photograph of this. So we’re going to go ahead and use our macro lens. Close down a little bit for me. Going to be a bright light. And we take our photo. Then the laboratory can see that as well, especially if there’s going to be multiple shades within the same case. And they can just go “Why he’s right, that is dark in there.” Or with this banding, maybe they’d put a little stain to neutralize, in fact, that’s a dark gray, maybe they’d put a little bit of pink, which is a complementary color.
So, 7 and 10 about an ND3. Now, I like to take- this is another important factor, I like to take the photo and the shade before I take my impressions. I also try to keep them as hydrated as possible because if we took our traditional impression, and let’s say it was regular set or even fast set, three to six minutes, these can dehydrate so much that this is an ND3 now, could look like an [00:08:00] ND1 with the dehydration. Then the laboratory would choose a different ceramic to neutralize the underlying problem. Which would yield [inaudible 00:08:06] it would be a darker tooth. So, we’re going to go ahead and write that down, if you can remember that for me, JoAnn, ND3. Now, this is kind of a tough one. If for some reason it’s between two shades, maybe it’s not as yellow as one shade and not quite as gray as the other, you can say half of ND4, half of ND7. So as we look here, we’ve got a gingival third that is really about an ND8 and then we have an incisal, again, the reason why we wanted to send then photo as well as the incisal versus gingival, is they can incorporate different staining. In fact, we’ll even stain the inside of the restoration.
If you look at a restoration in all ceramic and it’s going to be Emax and it’s going to be the new KDZ Bruxer® Aesthetic, which is our new translucent zirconia, we want as much translucency above the dentin as possible. So we can either paint a neutralizer or something to block that out on the front, which will give us that flat artificial look, or what we do, is we actually paint a very thin layer of a pacifier or a neutralizer on the inside or the intaglio portion of the crown. Then as I put this into place, it’ll neutralize that dark preparation, but we still have a lot of translucency on top of that. So, we’ve got ND8 on the gingival third of both number 8 and 9 and then the incisal is actually very bright as we see sometimes with these [inaudible 00:09:41] treated teeth, we’re at an ND2. So we’re going to go ahead and photograph that again so they see that I’m not crazy. They’ll say “Why did David give me two shades for a single tooth?” Turn toward me a little bit. [00:10:00] Okay, perfect. You doing all right, Dale?
Speaker 2: Yeah.
Dr. Hornbrook: Okay. All right, we’re got the preparation shades of the front four. Now, what does the lab do with this information? And that’s a key factor. Well, they have a material that’s called natural die material. Notice I- I actually wrote this on here, “Wash hands before using or mixing,” which is important whether you’re a CAD/CAM doc in your own office, and you’re mixing this up, or if your laboratory is giving these prep guides back or prep shades that maybe look a little grayer than they should. Even the oil or any debris on our fingers as we mix it, because what we’re going to do is, it’s a putty like material, we’re actually going to take this and it’s a light-cured material, we’re gonna take out- now, let’s say I had a mix ND4 with ND7 then they’ve got to put them together. Okay. Again this would typically be done in a laboratory unless you’re doing CAD/CAM in your own office, we’re going to go ahead and adapt this flexible- see it’s like a flexible resin, it’s light-cured. Then we will take this little plastic stick, some labs use metal, we use a plastic stick that comes with the kit from Ivoclar. You embed it in the crown and then we’re going to go ahead and light-cure this.
Now do all labs do this? No. Should they? Absolutely. But, they can’t do it unless you give them a prep shade so, in a new relationship, of course Keating will be doing this for you, but in a new relationship with a laboratory, I would make sure that you give them the prep shade and tell them you want these prep dies returned [00:12:00] to you. Because I light-cure that, the reason I like them returned is I can then check and try in on cementation day to see if I think I’m going to have to alter some [inaudible 00:12:15] shades, so, this just comes on and on and the ceramist is working with this. What they’ll do is they’re trying to get the nuances of the custom care [juristics 00:12:23], then they’ll put it on the prep die that represents, so it’s going to look like a mouth, making them check it next to the shade that I chose and say “Oh, it needs to be a little more orange [inaudible 00:12:36] or it’s too bright or it’s too dark. And then they can put custom staining whether it be internal or external.
So hopefully that helps for those that aren’t using their prep die, it’s actually very affordable, in fact you guys can give us a call at Keating and we can actually get a group rate for you. For those that are using it, make sure you use it properly. You have to take a prep shade for each individual tooth because lots of times they’re different, and then photograph that. I hope this was helpful and my goal here at Keating is to take your dentistry and our dentistry to an entirely different level. I invite you if you’re ever in the Southern California area, we are in Irvine, about 10 miles from Disneyland, 4 miles from Newport Beach. Give us a call and stop by, I know you would enjoy seeing our great laboratory.