On the topic of Dental Implant Crowns & Bridges, the big question that always comes up is should it be cemented or should it be screw retained? There’s a lot of factors that go into that. One of the very first ones is was the implant placed in the right spot?
Follow Dr. David Hornbrook (Clinical Director of Education and Technology) through this amazing Ultra High Definition Video tutorial and whiteboard lecture on Screw Retained Vs. Cement Retained Dental Implant Crowns in 2016.
Dental Implant Crown Video Transcript:
Hello, I’m Dr. David Hornbrook, the clinical director of Education & Technology here at Keating Dental Lab in Irvine, California. Today I want to talk a little bit about implant restorations. The big question that always comes up is should it be cemented or should it be screw retained? There’s a lot of factors that go into that. One of the very first ones is was the implant placed in the right spot? If I look at some cases here, and you look at this molar, it was probably placed using a surgical guide. It’s right in the middle of the edentulous space between the molar behind it and the premolar in front of it. This is ideal where I can do almost anything I want. My preference in the posterior is to do screw retained.
If for some reason we had failure, whether it be fracture of the ceramic, a screw came loose, or whatever the factor is, I can go in and I can access it through the access opening, unscrew it, take it off, do a repair, send it back to the lab. I just think it’s easier to get to. If it’s in the center, if it’s in the ideal position, we can either do screw retained or we can cement it. A case like this where it’s a replacement of a premolar, it’s a small implant. The implant was placed really too far distally. This is almost impossible to do a screw retained because the screw hole would come out right through the marginal ridge, and we wouldn’t get enough support of the abutment or the ceramic around that screw channel.
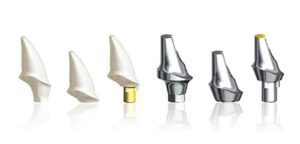
This is a situation where really we need to make a custom abutment and then make a cemented crown. We could go over dozens and dozens of cases, whether it be anterior or posterior, just looking at implant placement of whether it’s mandatory that it has to be a custom abutment versus screw retained. Here in the anterior, two implants. The position makes it impossible for us to do screw retained. The screw channel would come out right through the facial or the facial incisal, so the only way to fabricate a final restoration here is to make custom abutments, angle them toward the lingual, and then we would do cemented crowns. In the anterior, also we’re going to look at what do we want to have as this final restoration how much control we have.
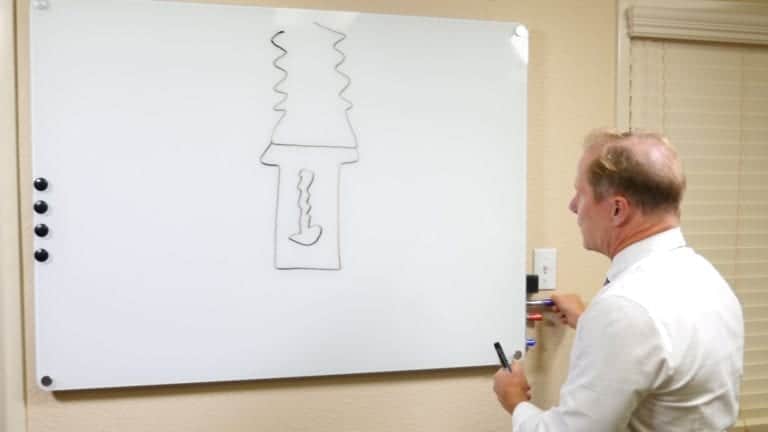
If we had an implant and we decided to do a screw retained, we can actually have a titanium base, and this would be our screw channel that would go through the titanium base. Then we can have the coronal aspect of that implant crown be so that the lab keeps a hole in the top of the crown. Let me go ahead and erase this. We go ahead and put the crown to place, screw it into the implant abutment, and then we would just fill this whole with a composite so that it blends in. That would be screw retained. If it was an anterior tooth, let’s say a maxillary central, so we have our implant still, ideally I would like more control of the final restoration. What I would prefer, and I can still have a titanium base … This originally was the UCLA style of abutment.
This would be titanium. Then I would have the lab make me an ideal prep, and this could either be zirconia or it could be lithium disilicate, and then they would make a crown to fit over this abutment. The advantage of this is I can actually have this zirconia or this lithium disilicate shaded dentin shade. This could be like an A2, let’s say. Then this final crown, which could be glass infused ceramic, it could be lithium disilicate, it could be one of the new esthetic zirconia like our Bruxer esthetic, then this can be made very thin. In fact, sometimes we’ll even make this at 0.5 to 1 millimeter.
Now it gives us the opportunity to have a very translucent restoration. We’re going to bond this into place, bond it to the abutment. We’re going to bond it utilizing a resin cement. We can actually alter the shades of our final restoration based on resin cement, almost like we’re cementing a veneer. Two primary factors, where was the implant placed, again, in the posterior I prefer screw retained if I ever need to access those in the future, and how much control we want for esthetics. In the anterior, I tend to do cemented crowns over an abutment. I hope that helps with some of the confusion. We look forward to seeing your next case here at Keating.