
There is a lot of information available about dental implants and the best way to perform them, but it can be a confusing amount of information to sort through. This week we’re talking about this and more with Bob Brandon, Keating Dental Lab’s General Manager. Communication and preparation are key for a successful case, and this is why.
Creating the Best Possible Dental Implants
Bob has been with Keating Dental Lab from the beginning, and implants are one of our fastest growing segments. As the dental industry changes, more general practitioners are beginning to perform implant procedures. While this makes getting a dental implant more accessible, it also means that there could be some subpar work. Which means it’s critical to work with an established dental lab.
In these cases, it’s important to get back to the basics. For a predictable result, you need to use good systems. The weekend course needed to learn placing dental implants can teach the basics, but it’s important to work alongside the lab. Dental labs have the expertise in the best material for each case, and can help provide a superior result.
As Bob states, in about half the cases a general practitioner will be more than qualified to perform the implant. But they’ll also come across some complicated cases, and it’s important to have the referrals to pass the case along to an oral surgeon or periodontist.
Have a Plan Before Choosing the Dental Implant
It’s important to have a restorative plan in place before selecting the implant itself. Some implant systems can offer you every option you need, but others will only offer you certain options you don’t. If the implant is chosen before you make a plan, you may end up with the wrong result.
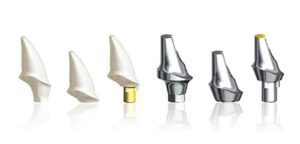
Because of the competition among manufacturers, the popular brands are remaining cost effective, both for us as a dental lab and for you as the dentist. We have a number of manufacturer-specific milling systems, we can work with Nobel, Straumann, or 3i, giving you flexibility in choosing your implants.
We also utilize Atlantis components, now Dentsply, which gives you a variety of options to make the best decision for your patient.
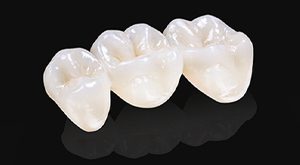
Using the Screw-Retained KDZ Bruxer
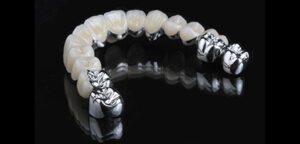
To help keep manufacturing costs low, we’ve developed our screw-retained KDZ Bruxer and KDZ Bruxer® Aesthetic. These come with the manufacturer specific titanium (or universal) base. The Bruxer crown is designed on top of it, and it’s luted in here in the laboratory, giving you a one-piece dental implant that makes the procedure easier on you and the patient.
However, if there is some pathage rot with the proximal contacts, it’s often best to leave the assembly to the dentist. The base goes in, then the crown and the contacts are adjusted. Then you can remove the universal base and cement it extraorally, which means there won’t be a chance of cement sepsis.
Some dentists may prefer a zirconia base, and while we can do it, the titanium to titanium connection is valuable when torquing the screw down. When there is a zirconia to titanium connection, there are a small number that need to be replaced after five to seven years. We want to avoid the inconvenience for the patient, which is why we recommend the titanium universal base for our KDZ Bruxer SRZ implants.
Mixing & Matching Dental Implants
There are some dentists we see mixing and matching dental implant pieces. While it could save some cost, it’s often not enough to warrant taking the chance on pieces that weren’t meant to be used together.
By using manufacturer specific parts, you’re able to ensure a much better fit for your patient. These companies have spent years in R&D to find the best match of components for their materials, and by going by their recommendations we’re able to help you save time and money in the long run.
The FDA carefully reviews all dental implants (and rightfully so), and once we looked at the data, we moved to maintaining the manufacturer-specific parts. This gives us the ability to make the best implant possible, and you don’t need to spend time with your patient trying to get two different pieces to fit together just right.
Setting Yourself Up for Success with Dental Implants
We want to set you up for success with your patient. This mean that when you come to us with a case, we’re going to do everything possible to make a dental restoration that perfect for that patient. But, we also need a good starting point. By taking quality impressions, we’re able to craft an implant that works.
Some dentists prefer triple trays, but in some instances it can distort the vertical relationship. If the triple tray is used for the opposing, and with the heading cap on, then we’re able to work with it. But if we’re at the fixture stage, then triple trays will hurt rather than help.
A triple tray can be used for the opposing as it gives us a good idea of the adjacent dentition on the working side, but again, it can skew the results and result in a less-than-ideal dental restoration.
The restoration could look fine on the mold, but once it goes into the mouth, the vertical relationship is disturbed. The abutment’s margin height will be off, as well as the proximal contacts and the occlusion.
For a single or two-unit restoration that won’t be connected, a closed tray impression will work. Because this method won’t capture margins, though, it’s important to use as high of viscosity material as possible.
Closed vs. Open Dental Impression Trays
Closed and open impression trays give different results, and the choice often depends on the type of impression needed. With an open tray, holes are drilled in the occlusal table, so the pin is exposed. The coping stay in the impression throughout the entire process.
This impression coping remains while it’s shipped to us and while we’re creating the implant cast. Because of this method, there should theoretically be no variation and 100% accuracy.
With a closed tray, the impression coping is in, and seat the tray until the material sets. When it’s removed, the coping will remain in the fixture in your patients mouth. It’s then removed and placed in a separate sterilization bag and the buckle side is marked.
This mark gives the lab another way to line up the copings and laboratory analog. The two potential sources of air (the office and the lab) gives the potential for misalignment, though with good brands of implant impression copings allow us the chance to orient with no problem.
Where to Find Open and Closed Dental Impression Trays
We offer stock plastic impression trays that just need a burr hole drilled where the pin needs to go. If we have a pre-operative cast for your patient, we’re able to drill the hole, and we do so regularly.
Or, the dentist can drill the hole himself when in the room with the patient. It’s a quick step, and gives the exact result needed.
Choosing the Ideal Dental Impression Material
Because there are a number of dental impression materials to choose from, it’s important to choose the right one. We prefer Impregnum, as it’s given us the most accurate results, though 3M’s polyvinyl imprint material is also very accurate. It’s also slightly more expensive, but worth the cost.
We don’t want to cut corners when it comes to our patient’s dental restorations.
Preventing Cement Sepsis with Screw-Retained Dental Implants
It’s important to prevent post-operative complications as much as possible, including cement sepsis. Also called cement contamination, it’s caused by cement that’s left in the sulcus on cement retained restorations. By using screw-retained Bruxers like we talked about above, or our screw-retained e.max and PFMs, we’re able to eliminate the cement entirely.
Screw-retained dental implants are a one-piece design, so we can control margin depth. As a porcelain fused to metal restoration, the ceramic is applied direction to the metal without the need for cement.
These restorations are slightly more expensive, because it’s an expensive piece to get from the manufacturer.
Once the PFM coping is constructed, the ceramist will apply the porcelain, and it will go through the final quality check. After this, the two pieces will be luted together with Ivoclar’s multi-link implant material; it’s a screw-retained PFM on an Atlantis abutment.
Final Advice for the Dental Implant Process
Ultimately, a case’s success depends on the planning and communication throughout the process. By planning correctly and communicating with the dental lab, there is a lower chance of the patient returning with a crooked implant. There are many issues to overcome during a dental restoration, so by taking the time to think through your patient’s needs ahead of time, you can spare issues later on.
It’s also important to understand the design limitations of different dental implants. If we’re using the wrong implant, the patient will have more problems instead of fixing what they initially came in for. Communication is key to maximizing the dental restoration for your patients!
It’s a common theme throughout that by taking a bit of extra time now, we’re able to prevent salvage work and extra time the patient needs to be in the chair. It’s important for implants to be just right, and that optimal fit requires planning and communication between the lab and the dentist. With this, we’re able to help find the ideal dental implant type to create a superior restoration for your patient.
Interested in hearing more from Shaun and our other talented guests? Check out our other Dental Up episodes on Facebook.